Lab 03 - introduction to SFML
Introduction to SFML
Use of external libraries
Until now we used standard libraries provided with a set of development tools (SDK) for a given system. Using the library required only attaching an appropriate header file in the program code. Due to the fact that these were standard libraries, their location was known to the compiler.
Adding an external library requires modification of the project settings by indicating where the library is located. In addition, the SFML library that we attach will be provided in compiled form. This means that the header file will contain only function declarations, and their implementation is delivered in the form of files containing compiled code, which should be indicated to the linker in order to correctly build the project.
Creating a project that uses SFML
Create a plain C++ application project. Place the content into
main.cpp file with:
#include <SFML/Window.hpp>
#include <SFML/Graphics.hpp>

int main() {
    sf::RenderWindow window(sf::VideoMode(sf::Vector2u(800, 600)), "My window");

    sf::CircleShape circle(100.0f);
    circle.setPosition(sf::Vector2f(100.0f, 300.0f));
    circle.setFillColor(sf::Color(100, 250, 50));

    sf::RectangleShape rectangle(sf::Vector2f(120.0f, 60.0f));
    rectangle.setPosition(sf::Vector2f(500.0f, 400.0f));
    rectangle.setFillColor(sf::Color(100, 50, 250));

    sf::ConvexShape triangle;
    triangle.setPointCount(3);
    triangle.setPoint(0, sf::Vector2f(0.0f, 0.0f));
    triangle.setPoint(1, sf::Vector2f(0.0f, 100.0f));
    triangle.setPoint(2, sf::Vector2f(140.0f, 40.0f));
    triangle.setOutlineColor(sf::Color::Red);
    triangle.setOutlineThickness(5);
    triangle.setPosition(sf::Vector2f(600.0f, 100.0f));

    while (window.isOpen()) {
        while (auto event = window.pollEvent()) {
            if (event->is<sf::Event::Closed>())
                window.close();
        }

        window.clear(sf::Color::Black);

        window.draw(circle);
        window.draw(rectangle);
        window.draw(triangle);

        window.display();
    }

    return 0;
}
Try to compile the project. The compiler will return
an error if the header file SFML/Window.h is missing from
the system paths it searches.
Adding SFML (Windows)
This setup uses precompiled SFML binaries and VS Code configuration. It does not use MSYS2 or terminal commands on Windows.
Download SFML from the official website (https://www.sfml-dev.org/download/), then choose the package that matches your compiler and architecture. In this course we use MinGW 64-bit, so pick the matching GCC MinGW package (not MSVC).
Extract the archive to a fixed path, for example:
C:\libs\SFML-3.0.2Make sure this folder contains:
C:\libs\SFML-3.0.2\include\SFMLC:\libs\SFML-3.0.2\libC:\libs\SFML-3.0.2\bin
After that, modify tasks.json:
{
    "tasks": [
        {
            "type": "cppbuild",
            "label": "C/C++: g++ build active file",
            "command": "C:/Qt/Tools/mingw1310_64/bin/g++.exe",
            "args": [
                "-fdiagnostics-color=always",
                "-g",
                "-std=c++17",
                "${workspaceFolder}/*.cpp",
                "-o",
                "${workspaceFolder}/app.exe",
                "-IC:/libs/SFML-3.0.2/include",
                "-LC:/libs/SFML-3.0.2/lib",
                "-lsfml-graphics",
                "-lsfml-window",
                "-lsfml-system"
            ],
            "options": {
                "cwd": "${workspaceFolder}"
            },
            "problemMatcher": [
                "$gcc"
            ],
            "group": {
                "kind": "build",
                "isDefault": true
            },
            "detail": "Task generated by Debugger."
        }
    ],
    "version": "2.0.0"
}
Now modify launch.json so VS Code can find SFML
.dll files during debug:
{
    "configurations": [
        {
            "name": "C/C++: g++ build and debug active file",
            "type": "cppdbg",
            "request": "launch",
            "program": "${workspaceFolder}/app.exe",
            "args": [],
            "stopAtEntry": false,
            "cwd": "${workspaceFolder}",
            "environment": [
                {
                    "name": "PATH",
                    "value": "C:/libs/SFML-3.0.2/bin;${env:PATH}"
                }
            ],
            "externalConsole": false,
            "MIMode": "gdb",
            "setupCommands": [
                {
                    "description": "Enable pretty-printing for gdb",
                    "text": "-enable-pretty-printing",
                    "ignoreFailures": true
                },
                {
                    "description": "Set Disassembly Flavor to Intel",
                    "text": "-gdb-set disassembly-flavor intel",
                    "ignoreFailures": true
                }
            ],
            "preLaunchTask": "C/C++: g++ build active file",
            "miDebuggerPath": "C:/Qt/Tools/mingw1310_64/bin/gdb.exe"
        }
    ],
    "version": "2.0.0"
}
If your MinGW path is different, update both g++.exe and
gdb.exe paths accordingly. If your SFML folder name is
different, update all C:/libs/SFML-3.0.2/... paths.
After these changes you should be able to build and run SFML code on Windows without MSYS2.
Adding SFML (Linux)
Check if SFML is already installed on your system by running the following command in the terminal:
ls /opt/sfml-3/lib | grep sfmlif you see files with sfml in their name, it means that
the library is already installed and you can skip the next step and move
to modifying task.json and launch.json files.
If not, you need to install the library first.
Download SFML from the official repository. To do it, run the
following commands in the terminal (ctrl + alt + t to open
it and ctrl + shift + v to paste the commands):
sudo apt-get install -y wget build-essential cmake pkg-config libx11-dev libxrandr-dev \
libudev-dev libgl1-mesa-dev libfreetype6-dev libjpeg-dev libopenal-dev \
libflac-dev libvorbis-dev libogg-dev
git clone https://github.com/SFML/SFML.git
cd SFML
git checkout 3.0.x
mkdir build
cd build
cmake .. -DCMAKE_BUILD_TYPE=Release -DBUILD_SHARED_LIBS=ON
cmake --build . --config Release --parallel
sudo cmake --install . --prefix=/opt/sfml-3
ls /opt/sfml-3/lib | grep sfml
After that, modify task.json to include the path to the
SFML installation, like this:
{
    "tasks": [
        {
            "type": "cppbuild",
            "label": "C/C++: g++ build active file",
            "command": "/usr/bin/g++",
            "args": [
                "-fdiagnostics-color=always",
                "-g",
                "-std=c++17",
                "${file}",
                "-o",
                "${workspaceFolder}/app",
                "-I",
                "/opt/sfml-3/include",
                "-L",
                "/opt/sfml-3/lib",
                "-Wl,-rpath,/opt/sfml-3/lib",
                "-lsfml-graphics",
                "-lsfml-window",
                "-lsfml-system"
            ],
            "options": {
                "cwd": "${workspaceFolder}"
            },
            "problemMatcher": [
                "$gcc"
            ],
            "group": {
                "kind": "build",
                "isDefault": true
            },
            "detail": "Task generated by Debugger."
        }
    ],
    "version": "2.0.0"
}
Keep in mind that the line "-Wl,-rpath,/opt/sfml-3/lib",
must match the SFML installation path. If you install SFML in a
different directory, update the include path, library path, rpath, and
LD_LIBRARY_PATH accordingly.
Next, modify launch.json to include the path to the SFML
library:
{
    "configurations": [
        {
            "name": "C/C++: g++ build and debug active file",
            "type": "cppdbg",
            "request": "launch",
            "program": "${workspaceFolder}/app",
            "args": [],
            "stopAtEntry": false,
            "cwd": "${workspaceFolder}",
            "environment": [
                {
                    "name": "LD_LIBRARY_PATH",
                    "value": "/opt/sfml-3/lib:${env:LD_LIBRARY_PATH}"
                }
            ],
            "externalConsole": false,
            "MIMode": "gdb",
            "setupCommands": [
                {
                    "description": "Enable pretty-printing for gdb",
                    "text": "-enable-pretty-printing",
                    "ignoreFailures": true
                },
                {
                    "description": "Set Disassembly Flavor to Intel",
                    "text": "-gdb-set disassembly-flavor intel",
                    "ignoreFailures": true
                }
            ],
            "preLaunchTask": "C/C++: g++ build active file",
            "miDebuggerPath": "/usr/bin/gdb"
        }
    ],
    "version": "2.0.0"
}
After these modifications, you should be able to compile and run the program.
Adding SFML (MacOS)
First install sfml.
brew install sfmlOn apple intel it is installed in,
/usr/local/opt/sfmland on apple silicon in,
/opt/homebrew/opt/sfmlAfter installation we have to modify task.json. We have
to add information about c++ standard -std=c++17 and
include and link libraries
-I<installation_path>/include,
-L<installation_path>/lib,
-lsfml-graphics, -lsfml-window,
-lsfml-system. So the modified file should look similarly
to this:
{
    "tasks": [
        {
            "type": "cppbuild",
            "label": "C/C++: clang build active file",
            "command": "/usr/bin/clang++",
            "args": [
                "-fcolor-diagnostics",
                "-fansi-escape-codes",
                "-std=c++17",
                "-g",
                "${workspaceFolder}/*.cpp",
                "-I/opt/homebrew/opt/sfml/include",
                "-L/opt/homebrew/opt/sfml/lib",
                "-lsfml-graphics",
                "-lsfml-window",
                "-lsfml-system",
                "-o",
                "${fileDirname}/${fileBasenameNoExtension}"
            ],
            "options": {
                "cwd": "${fileDirname}"
            },
            "problemMatcher": [
                "$gcc"
            ],
            "group": {
                "kind": "build",
                "isDefault": true
            },
            "detail": "Task generated by Debugger."
        }
    ],
    "version": "2.0.0"
}
It is not necessary but recommended to add
c_cpp_properties.json in .vscode folder. This
files tells IntelliSense where to search for libraries and makes
autocompleation work. In this new file paste:
{
    "configurations": [
        {
            "name": "Mac",
            "includePath": [
                "${workspaceFolder}/**",
                "/opt/homebrew/opt/sfml/include"
            ],
            "defines": [],
            "compilerPath": "/usr/bin/clang++",
            "cStandard": "c17",
            "cppStandard": "c++17",
            "intelliSenseMode": "macos-clang-arm64"
        }
    ],
    "version": 4
}
Now you can try and compile the code.
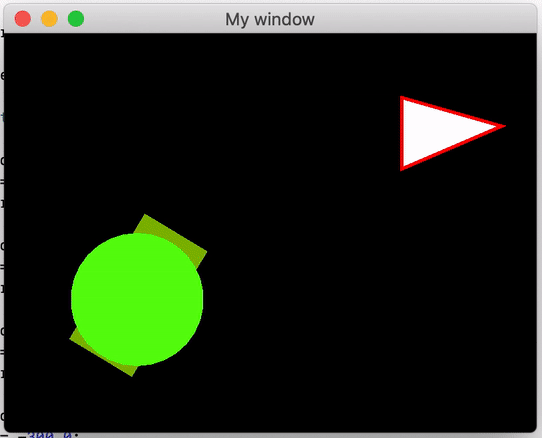
Final result
After succesfull compilaiton you should see the rendered image as follows.

SFML library
SFML is a multi-platform library that facilitates the creation of programs that use two-dimensional graphics, e.g. simple games. It contains modules that allow you to generate graphics - drawing simple geometric figures with textures, keyboard/mouse input, sound and network operation.
The library API documentation can be found at the following address: https://www.sfml-dev.org/documentation/3.0.2/
Tutorials describing the basic functionality are available below: https://www.sfml-dev.org/tutorials/3.0/
All library resources are located in the namespace sf.
To avoid cluttering the main namespace, we will stop using the
using namespace ... directives, and instead precede the
corresponding names with sf::, std::, and so
on.
The example above shows a typical SFML application runtime. It
includes the initialization of the window (class
sf::RenderWindow) and the resources used in the program (in
this case three shapes), and then performing a cyclical program loop,
each course of which leads to the generation of one image frame, until
the main window is closed.
Inside the loop, a queue of events (keystrokes, mouse movement, etc.) is checked, and an image frame is generated from the position: the “canvas” of the window is cleared, further objects are drawn, and finally the framebuffer is replaced.
🛠🔥 Assignment 🔥🛠
Analyse how the sample code works. Change the size and layout of the elements on the scene, try to add more. What happens when you change the size of the window after starting the program? In what units are the sizes and position of objects on the scene expressed?
Time measurement, animations
The animation of objects involves displaying slightly modified object in each frame of the image (in each pass of the main loop) in order to get the impression of smooth movement.
In order for the animation of objects to be smooth and its speed independent of the number of frames per second displayed, we have to adjust the subsequent frames of the animation, for example, in one of the following ways:
- we can measure the time that has passed since the last frame was drawn and use this as a basis for determining the animation step;
- we can move objects from a separate thread at a fixed frequency;
- we can assume a fixed frame rate - in this case, if the computer does not keep up with the calculations or display, the animation will slow down.
In today’s example we will use the first method. To measure the time
we can use the class sf::Clock. It is a stopwatch clock
that starts measuring time when an object is created. It allows you to
read the elapsed time and restart measuring. See: sf::Clock
documentation.
Basic working example using sf::Clock in game logic:
sf::Clock clock;
while (window.isOpen())
{
    sf::Time elapsed = clock.restart();

    ...
}
sf::Clock::restart method will zero the counter and
return the sf::Time object representing time elapsed from
the previous restart. See sf::Time
documentation. Following methods can be used to extract time in
different formats:
🛠🔥 Assignment 🔥🛠
Refer to the documentation for sf::Clock class. Add the
sf::Clock object to the program in such a way as to be able
to measure the time between successive runs of the main loop. Display
the time in the console in microseconds. How many frames per second does
your program draw?
Moving an object
All “drawable” objects in the SFML library have a set of methods
allowing for their manipulation (transformations) on the screen plane -
moving, scaling, rotating. The method to move in relation to the
current position is
move(sf::Vector2f(float offsetX, float offsetY)).
🛠🔥 Assignment 🔥🛠
Create two variables in the program that represent the speed of one
of the objects - the horizontal (x) and vertical (y) components,
e.g. rectangle_velocity_x and
rectangle_velocity_y. They will denote the speed of the
object in pixels per second. Give them values of 50 and 150
respectively.
Use the time calculated in the previous task and in each loop run
move rectangular object with the sf::Transformable::move
method by the distance that should be covered in the measured time at
the set speed. HINT:

Then add the variable rectangle_angular_velocity
describing the speed of rotation of the figure around its axis (in
degrees per second) and give it a value of 10. Use the
rotate(sf::degrees(float degrees)) method to cause the
object to rotate.
Simple collisions
Collision detection between objects on stage is the foundation of the mechanics of many games or applications that perform simple physics simulations. Since accurate collision calculations for many irregular objects would be very resource-intensive, some simplifications are used, such as approximating the shape of objects with a rectangle/circle (in a plane) or a cuboid (in 3D space).
The objects we have drawn have the getGlobalBounds()
method, which returns the sf::FloatRect rectangle which is
the outline of the figure, in the coordinates of the window. Usage
example:
sf::FloatRect rectangle_bounds = rectangle.getGlobalBounds();
std::cout << "Top left corner coordinates are: " << rectangle_bounds.position.x << " " << rectangle_bounds.position.y << " " ;
std::cout << "Size od the rectangle is: " << rectangle_bounds.size.x << " " << rectangle_bounds.size.y << std::endl;
🛠🔥 Assignment 🔥🛠
Using the contour of a rotating rectangle, write a set of conditions
to verify that it touches one of the edges of the screen. If so,
“bounce” it by changing the return speed in the correct
direction depending on the wall the object is hitting. You can assume
that window has fixed dimensions (or advanced check for current
window size using sf::RenderWindow::getSize
method).
Colours
Colours in SFML are described in RGB (red, green, blue). Each color component is an 8-bit number without a character (0-255 range). This is a very common way of representing colour in computer graphics. It’s sometimes called RGB888 or RGB 24-bit.
The basic figures in SFML have a contour and fill colour.
For example:
rectangle.setFillColor(sf::Color(255, 255, 0));will change the colour of the filling of the rectangle to yellow.
🛠🔥 Assignment 🔥🛠
Add a change of colour of the rectangle to a random colour after each bounce, so that the effect is similar to the one shown below:
Authors: Tomasz Mańkowski, Jakub Tomczyński, Dominik Pieczyński